Easy Sugar-Free Vegan Ice Cream Recipe!
- Shona McCarthy

- Jan 20, 2021
- 4 min read

(Pixabay, 2021)
One of the things I miss about my trip to Japan is all of the wonderful exotic flavours of ice cream I could find there. Many tourist locations, particularly Arashiyama and Kiyomizu in my recollection, will sell a vast array of unexpected and unconventional ice cream flavours. But I find that dairy products sometimes upset my stomach. And while I love the taste and feel of ice cream, I don't like the way it adds to my hips. So I thought, What if I can make my own replacement here in Australia? But I'm a bit of a lazy person, and I don't have a functioning ice-cream machine. So how do I get those sweet, creamy, refreshing flavours I want? This recipe takes some pre-preparation the night before you really make it. So read through before you start.
(Images of different ice creams I tried in Japan, 2019.)
You will need: Creaminess: A can of coconut cream, left in the fridge over night.
A blender
A whisk
A half cup of cashew nuts, soaked in water over night. (The inclusion of soaked almonds and peanuts doesn't seem to hurt, but walnuts, macadamias and brazil nuts seem to perform badly. Also, if you have a nut allergy you could replace this all with mashed bananas and more coconut cream. The nuts are really only part of this recipe because I suspect pure coconut cream would be too oily and rich!)
Flavours:
2 Tablespoons of stevia or similar sweetener
1 Teaspoon of vanilla essence
1 half cup of your favourite fruits (or other food items you want to try) and toppings
Cold:
A reliable freezer
Containers that can withstand being frozen
Tip: If you're wanting to make your own matcha ice cream, or other tea flavours, I recommend emptying two teabags into four tablespoons of hot water and letting it soak for at least a few minutes before adding it to the mix. This allows the leaves to soften and the flavour to come out. To get more green colour, I recommend adding some baby spinach at the blending phase, since it has a lot of colour but virtually no flavour.
Steps: 1. Drain your nuts and put them in a blender with the fruits, stevia and vanilla essence. If you're wanting to include chocolate powder, nutrient powder or tea leaf mixture for your flavour, this is the time to add them. Blend them all together till they are as smooth as you can get them. We'll call this the favour mix.
2. Whip your coconut cream, still cold, till it stiffens like whipped cream. It's easier to do this by machine, but I was able to achieve this with egg beaters and elbow grease. To make it even fluffier, you can chill the beaten mixture for a few hours and then whip it again!
3. Place the whipped coconut cream and the flavour mix into the same container and carefully fold the two together, trying to keep all the air from the whipping process. This will help your ice cream to be more edible and soft. This would be the time to add any solid toppings or ribbons of sauce you want to add.
4. Gently pour the mixture into the freezable containers and leave in a freezer. Periodically return to mix the frozen crystals into the unfrozen parts to make sure it doesn't set too firm to scoop. How long the mix takes to solidify will vary dependent on the power of your freezer. But I find overnight is a good benchmark.
And then you're done!
Naturally, the above proportions are a guide. As you experiment with different fruits and flavours, you'll naturally find that you may wish to modify the ratios to suit your personal taste. But in any case, you now have the freedom to make your own non-dairy ice creams with whatever flavour you want! You could even divide the nuts and cream into smaller portions and add different flavours to each so you can have many smaller quantities of different tastes!
The result isn't exactly like typical ice cream. But if you're trying to have a sweet yet healthy treat, this makes a wonderful replacement! If you're finding it too hard to scoop, try leaving it to thaw a little before you eat it. Since it's plant-based, you don't have to worry so much about it going bad the way you'd have to worry with standard ice cream! Though still be careful, since bad coconut can be dangerous. There was still a very lovely apple ice cream I tried in Arashiyama which I can't replicate using this method, since it was not creamy at all. It was more as though they had blended an apple, added some apple sauce or concentrate and maybe a little sweetener of some kind and froze it, and that would likely require a churning process to replicate. I may, in future, figure out a churn-free way to do that too. But that will have to wait for another time.
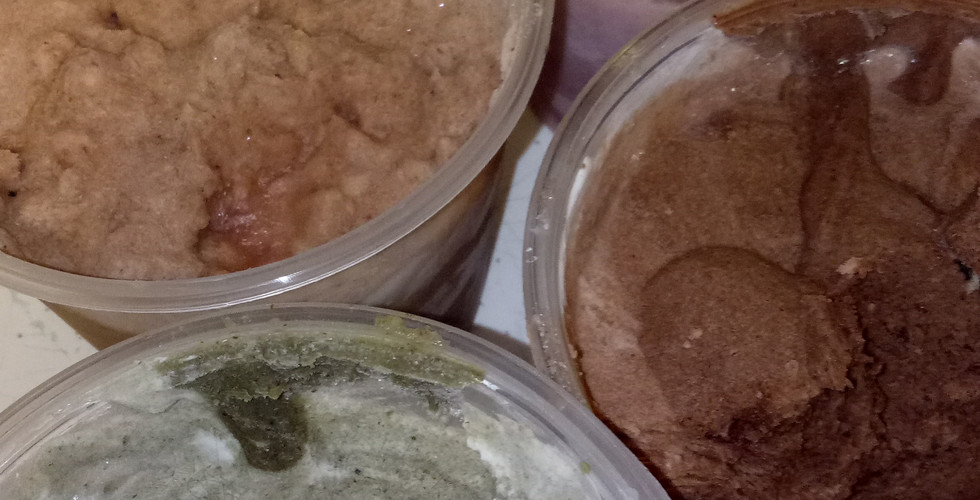
(I tried my hand at choc banana, strawberry-cherry brandy, matcha and peach-earl grey. 2021.)
If you've been finding my blog posts entertaining or helpful, I hope you'll consider making a contribution of your choosing to my PayPal pool, through the link below. I'm currently saving up so I can repay my student debt as quickly as possible, and unfortunately the ads in this blog aren't paying off. Forming these blog posts takes time, and while I take great pleasure in it, I still find I need to make a living. So, anything you could give would mean a lot to me: paypal.me/pools/c/89Ab7XEzQ9
If you would like to supplement your virtual experiences of Japan with real life, wearable objects, you could try perusing my online store. I try to keep my prices reasonable, and my products a blend of the fun and practical:


Comments